
Using technology with Kindergartners does not need to be intimidating! Brittany Jackson from Technically It’s Kinder shares how she integrates Seesaw and PicCollage into her Kindergarten classroom with engaging & student-centered activities that allow her Kinders to showcase their learning.
Integrating technology into today’s classroom setting can be daunting for any educator, let alone those who educate our littlest of learners. When my Kindergarten class became 1:1 I felt extremely overwhelmed, but I was determined to not be defeated.
My goal was for my students to not just use a few apps here or there as a substitution for activities or lessons, but I sought out to find a couple “must have” apps that would be beneficial cross-curricular and user-friendly for my primary friends.
Having a consistent way to share files, images, drawings, links, and videos with students, and having a consistent way for students to turn work back into me while being user-friendly for primary students was what lead me to Seesaw.

What is Seesaw?
Seesaw provides educators with many useful features to:
- save time on organizing content
- create a device workflow solution
- create easy formative assessments
- give instant student feedback
- provide a safe place to teach 21st Century skills
For students, Seesaw gives them the tools to independently document their learning and thinking. Seesaw provides students an audience for their work—their peers, educators, parents, or the world.
Families are able to have access to an immediate and personalized window into their student’s school day when using the Seesaw app. No more asking, “What did you do at school today?” but instead, “Today I seen that you…” Educators must “approve” all new additions and comments before anything is shared with parents.
What can Seesaw Do?
Using Seesaw, students can “show their thinking” using photos, videos, drawings, images from camera rolls, text, links, and files (Google Drive files can be accessed directly via Seesaw). You can also import directly from most popular apps.

When students add content using Seesaw, it is automatically organized by student, content area, and immediately available to educators from any device. Seesaw makes it easy for students, educators, and parents to analyze progress over time and demonstrate growth made by students. Seesaw is compatible with many devices like making it convenient for those BYOD (Bring Your Own Device) schools or classrooms.
Download Seesaw for iOS, Android, Kindle Fire, and Chromebooks.
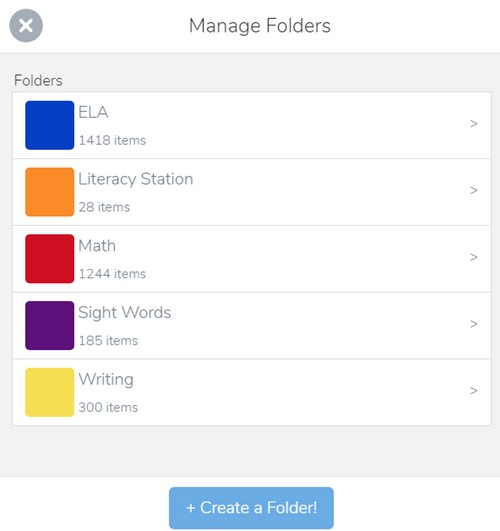
Organizing Work in Seesaw
Using folders within Seesaw is a great way to organize student work by subject areas or any way you wish. It is beneficial to color-code your folders. My students ask, “Which color do you want me to put this in?”and before long they knew red was math, blue was ELA, purple was Sight Words, etc. By organizing content using folders educators are able to browse work from the entire class, or for a single student.
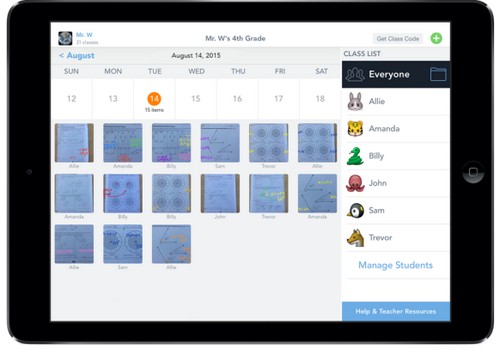
Educators also have the ability to use the calendar view to have insight on dates assignments were submitted by students (click on date and all assignments submitted that particular day will appear). This in all makes Seesaw a great asset at parent teacher conferences or even student-led conferences.
Setting Up Seesaw
Once you arrive at the Seesaw website, you will be prompted to create an account. Upon creating your account it is time to create your class and decide how students will log in. If you are a primary teacher (K/2), I highly suggest the QR code option. Students sign in using the QR Class Code.
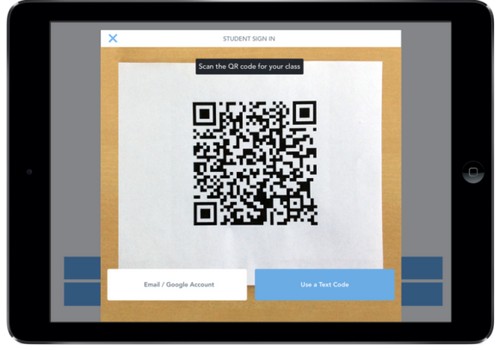
Keep a few copies of the code around your classroom for easy accessibility to students in case for some reason they log out. You will receive an email with a code specific to your class, be sure to check for it.
You are also given the option to have students use email/Google accounts to sign in. I suggest this option for older students. Students choose their name/icon from the class list to add items to their journal.
 Students Can Show What They Know With Seesaw
 Students Can Show What They Know With Seesaw
Now that you have some insight on how the application works, let’s explore possibilities for students to show understanding using Seesaw. As I stated before, my goal was to find an application that allowed my students to show their thinking using tools readily available to them using a consistent workflow.
Enable the Three Magic Buttons
One of my favorite features of Seesaw is “The Three Magic Buttons”. When educators send content to students, they are able to access it through the Feed View of the application and create their own copy to edit. The most important step to remember is that you must first turn on this feature.
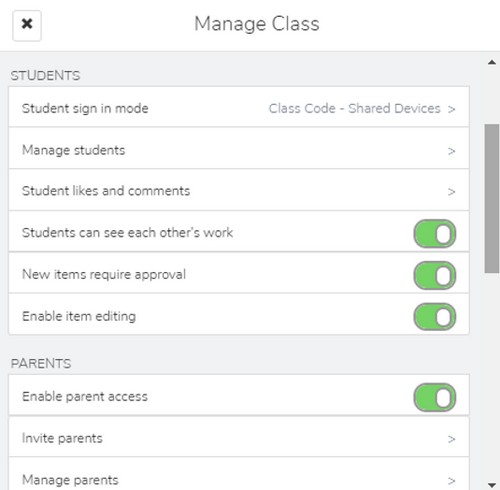
Enable Item Editing for Students
- Tap your profile icon
- Tap Manage Class
- Turn “Enable Student Editing” to ON
Now you can add items for your students to make their own edits on top of:
- Add the item into Seesaw from your teacher account. This works best with images, items from the camera roll and notes.
- Click the green submit button, not tagging any students, you may want to select the folder the activity/assignment will be placed in, this will save a step for students once they edit and submit their assignment. I personally do not tag it to everyone. Doing so will send parent notifications and this is just the template, no edits will have been made at this point.
- Have students tap the […] “Three Magic Buttons” below the item and choose “Copy & Edit”. This will duplicate the item and students can make their own annotations on top of it using text labels, drawings, and voice recordings.
- When they’re finished, students should submit the item like normal. It will show up as a new item in your teacher approval queue.
It is important to note that Seesaw allows up to 50 labels at this time. Be cautious of the task and how many characters it may take for students to complete tasks within the application.
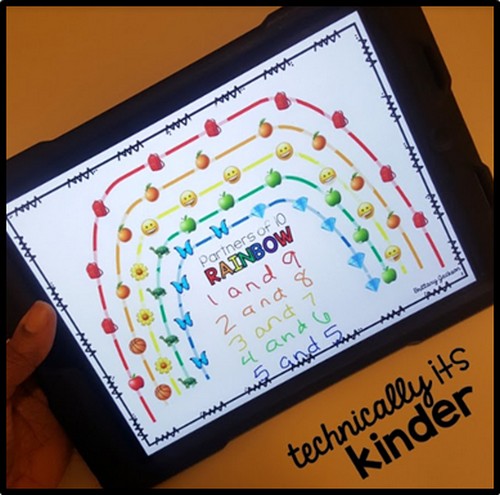
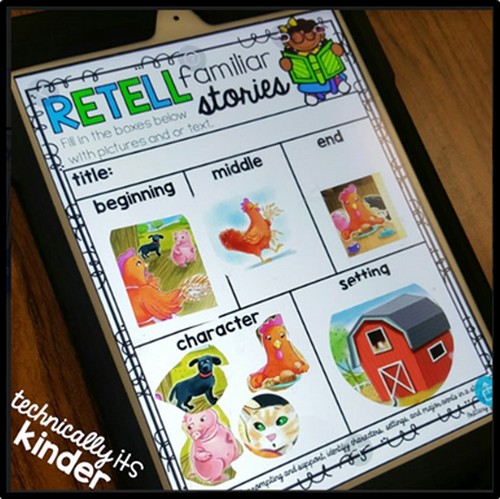
Examples of assignments completed directly in Seesaw.
Saving Seesaw Images to the Camera Roll
Seesaw also provides the ability for students to save images to their camera roll via the feed view.
- Add the item into Seesaw from your teacher account. Works best with images taken directly with camera feature or items from the camera roll (screenshots).
- Do not tag the item with any student names. It will show up in the Class Feed as posted by you. No parents will be notified.
- Tap the […] Three Magic Buttons below the item > Share Item > Save to camera roll/Download.
Appsmashing with Seesaw
The above is how I manage many app-smashes with my students. I am able to provide them with a template to save in their camera roll and use within other applications. My go to application for this type of app-smash is none other than PicCollage Kids (kid version of PicCollage with a filter for web searching).
Pic Kids allows students to be creative and use various tools as Seesaw does, adding the web search and camera feature directly within the application for student use. Once the assignment is complete within Pic Kids, students can save the assignment to their camera roll and submit via Seesaw.
It is important to note that Pic Kids also allows up to 50 labels at this time. Be cautious of the task and how many characters it may take for students to complete tasks within the application.
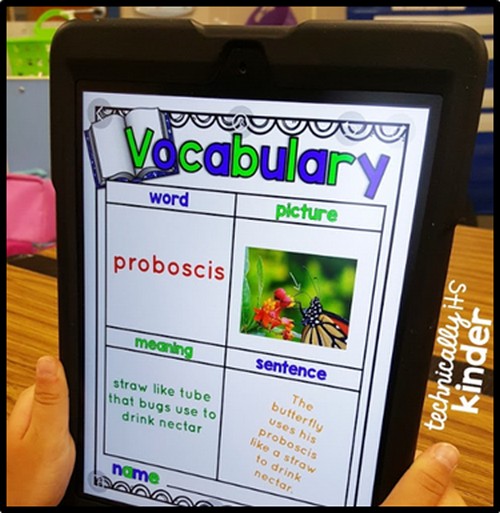
Examples of assignments completed using Seesaw and PicCollage Kids
Audio in Seesaw
Once my students complete their task, they know that more often than not I request that they record their thinking when submitting their assignment via Seesaw. This feature allows me as an educator to analyze their thinking and catch any student misconceptions. Any photo or assignment created in Seesaw can add a voiceover using the record feature; you can now draw AND record at the same time!
It is important to note the following about the Seesaw recording feature:
Audio Recordings
- Audio Annotation on Item: 5 min
- Audio Comment: 2 min
Videos
- Length: 5 min
- File Size: 500 MB
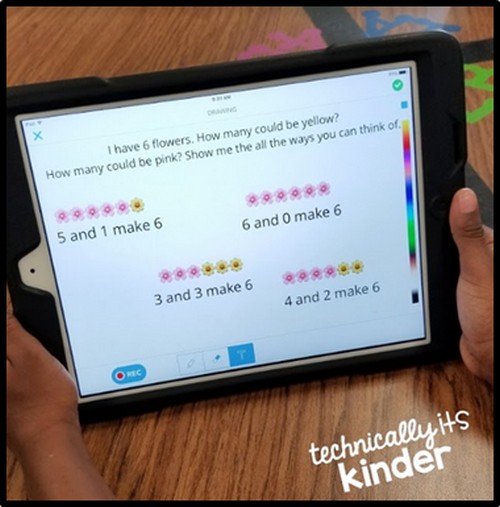
Example of an assignment with the record feature
Seesaw and Pic Kids have changed the way in which I am able to implement technology across all content areas in the classroom by creating a workflow that allows students to use technology to create and express their thoughts about concepts using 21st Century skills and digital tools.
About the author
I am Brittany from the Instagram Account Technically Its Kinder as well as the TeachersPayTeachers store by the same name. I am passionate about integrating technology into primary classrooms engaging learners by allowing them to use 21st Century skills and tools to show their thinking about their learning of concepts taught. I have been in working with Kindergarten students for the past 10 years. In my free time, you can find me spending time with my family and friends, shopping, crafting, watching reality TV and sipping on Dr. Pepper.