
I wanted to share my workflow for creating and using QR codes to make a hallway or bulletin board display. Even though my students upload most of their digital projects onto their blogs there are times I want to share specific projects with parents or the school community.
Many of the projects we make on the iPad are very saturated with colors and images. I don’t want to use that much ink printing all of them so instead I print a QR code that links to the image. There are many ways to go about doing this, but I am sharing the exact steps I follow for any digital work saved to the camera roll.

You will need a Google Account.
I’ve can’t stress enough that whatever app your students are using, the first step is to get them to save their work to the camera roll – most apps have a way to do that (usually a box with an arrow button) or students can take a screenshot. Once it is in the camera roll, I have two methods I use depending on whether the finished product is a video or a picture. My post about making QR codes for videos is {here}.
This post is all about making QR codes that link to images.
Share images from the Camera Roll to Google Drive
Have students upload their pictures to a specific folder. I make one on our {class Google Drive account}. I print out {this} direction sheet:
and students follow the steps to get their work into the folder. We recently made Venn Diagrams on an app and saved them to the camera roll, so I made a folder on Drive called “Venn Diagram” that students uploaded their work too. Plus with all of their work in one place, I can assess, give feedback, or fill out any rubrics.
Making QR Codes with Google Sheets: Prepare the Sheet
Next download and prepare a QR code generator spreadsheet. This sounds complicated by it is not. First, you will need to save a copy of the below QR code spreadsheet to your Google Drive Account. Make sure you are logged into your Google Account. After clicking the picture below, scroll down and find the QR code sheet template on Tammy’s blog, click it, then choose “Yes, Make a Copy.” I rename mine to match whatever project I am doing:
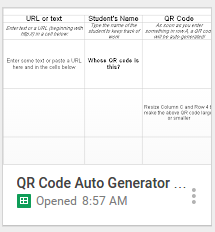
Be sure not to delete any of the formulas in the spread sheet. If you do, just grab another copy. I keep that open in one tab on my Chrome browser. I have slightly adjusted the template from Tammy’s Technology Tips for Teachers. In another tab, you will go to your project folder with all of the student work saved in it. Here are the two tabs I keep open – the QR generator and the student folder:
![]()
Making QR Codes with Google Sheets: Get image URLS
Now you will grab the share URLs of each of the student images in the folder. To do that, click back on the student folder. Hold the “alt” key (or right click) and click on the image to open a drop-down menu. Select Share. Another menu will pop open. Choose “Get shareable link” in the upper left corner: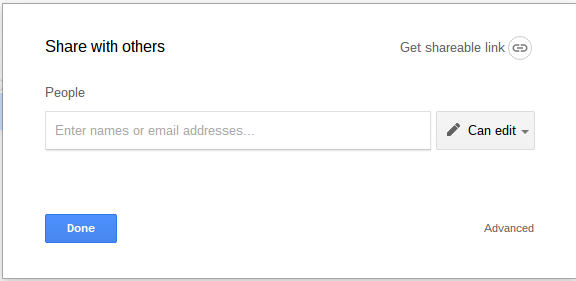
Another menu pops up. Click “Copy Link” or control+C when clicking the link to grab it.
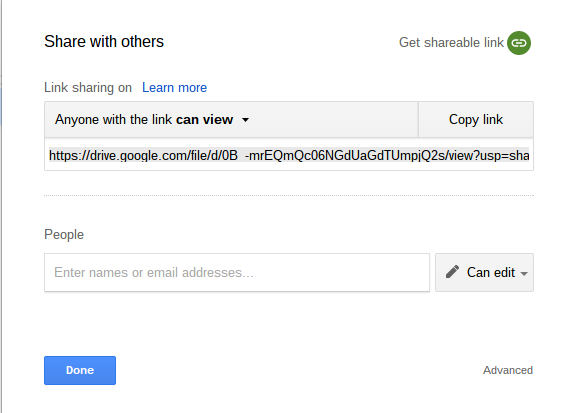
You will want to keep the default setting “Anyone with the link can view.”
Making QR Codes with Google Sheets: Paste into the sheet
Now that you have you link, click your tab to open the QR Code Auto Generator sheet and paste the link into an open cell in Column A. You will see the QR code auto-generate – like magic! In Column B be sure to write the name of the student whose work it is since you won’t be able to tell otherwise.
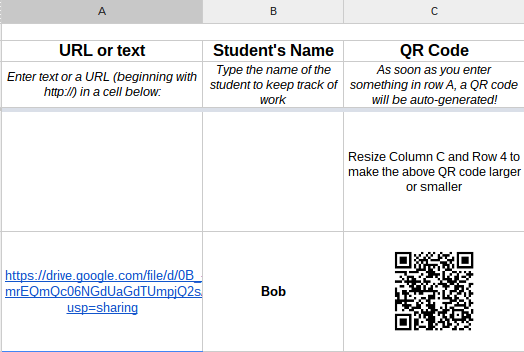
Repeat steps #3 and #4 for each student. I know you are probably thinking “No way am I doing that 24 times!” But trust me you will get very fast at sharing, copying the URL, clicking between tabs, pasting the URL and writing the student name. I can do a class set in about 5 minutes even though I was a nervous wreck the first few pastes!
Making QR Codes with Google Sheets: Print & Display
When ready to print, click the bottom of the QR Generator Sheet to read the print instructions:
![]()
Next, cut out each of your QR codes and attach to some sort of display. I like to use mini iPad clipart with the students’ names written in them or I attach them to related work. I do one student at a time so I do not loose track of whose work is whose.
My students love viewing each other’s work and we often get visitors from other classes scanning our hanging QRs. Now that making QR codes is so easy, I make interactive displays and anchor charts all the time!