
Have students use Google Slides to create and publish their own ebooks! Works especially well for research books and other nonfiction pieces. Learn how to create a book with Google Slides and how to share it with others during a paperless writing celebration.
Create and share digital books in the classroom with Google Slides
As much as I write about iPad apps, I’m a huge Google user in and out of the classroom. I own a Chromebook and use the Google Apps such as Drive, Slides, Docs, Sheets, and Forms all the time.
In fact, many of the projects we do with iPads would not be possible without Google Drive to easily upload our finished images or videos easily into one place.
How to use Google Slides to make digital books
Another Google project we do that works seamlessly with iPads is to create digital books on Google Slides then create a QR code using the share URL so that students can scan the QR code and read each other’s stories quickly. They can also just open the free Google Slides app and do the same but who doesn’t love a QR code – plus by hanging our QR codes in the hall we can share our stories with the school.
That could sound complicated to those of you still beginning your tech journey so I will show you step by step how this works.
Create a Google Account
First you will need a Google Account – either a free classroom Google account that you share with your students or students can use their own log-in if your district assigns those via GAFE.
Next have students open Google Drive and click the read create button and select “Slides.” They need to name their book. You can also have students go directly to Google Slides and log in from there too or assign them a blank slideshow through Google Classroom.
Set up the pages of the book
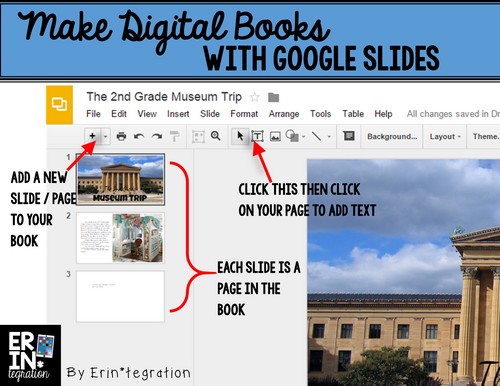
I tell students that each individual slide is 1 page of their book. The first slide will be their cover. If you are making a nonfiction text, you can have a slide for the table of contents too.
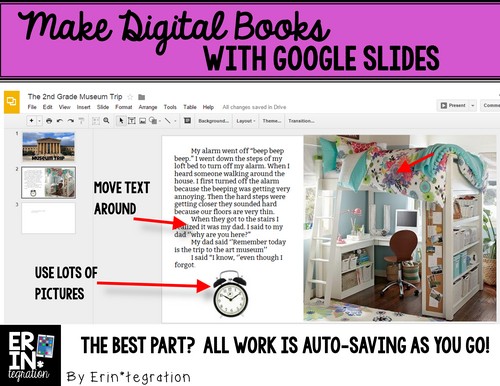
One of the reasons we use Slides is that Slides gives students the ability to click and drag their text and images anywhere on the page which allows for a variety of page layouts and makes the books look “real” when being read digitally.
Slides, like all of the Google Apps, autosaves, which is AMAZING because somehow elementary students will figure out how to delete theirwhole story multiple times as well as delete other people’s stories and wipe-out the entire My Documents folder if using Microsoft Word in the span of 5 minutes.
How to edit each “page” or slide in the book
Since each slide is one page, students will need to add text via text boxes which are opened by clicking the T in the ribbon. Students will also need to click somewhere on the slide to insert their text box before typing.
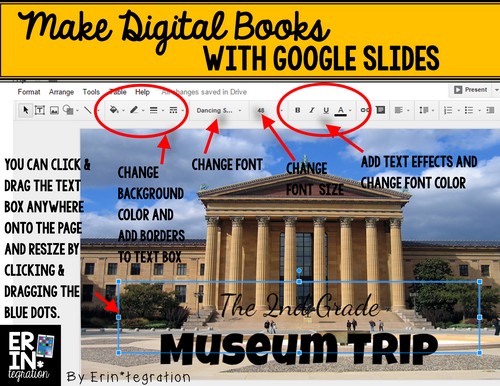 Similar to Microsoft Word or Pages, you can edit the text using options available in the ribbon. My students like to change the background color of the text box and add borders. This is especially effective when creating a nonfiction book since they may have various captions, fact boxes, and headings on the page.
Students can also change the shape of the text box so they can easy align text on one half of the page and have images on the other half for example.
Adding images to digital books on Google Slides
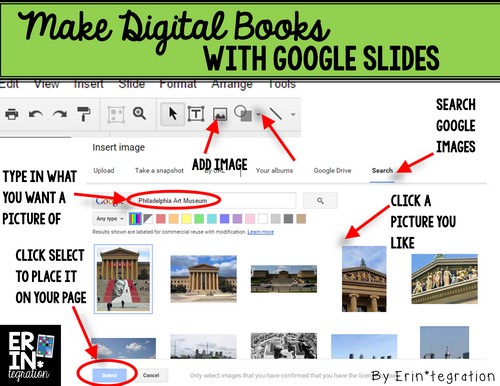 The best part of using a Google App is you have built-in Google image search. Students click the image button (the mountain) and select “Search.” They simply type in their search term and images pop up.
For elementary students, you will want to make sure you have Safe Search turned on in Chrome – most districts do this automatically. To check, I always do a test run by myself where I type in something inappropriate and see what comes up. Even with Safe Search, I do not allow my students to scroll or go to a second page of results just in case.
Using the real images comes in handy when writing nonfiction, but also adds a lot of interest to fiction pieces as well. Students can layer as many images as they want onto their pages.
Finishing touches and saving digital books made on Google Slides
There are many options for sharing finished stories. Students can click the File to open a drop down menu. From there they can print their stories or save as a .pdf for easy digital sharing.
If student books do not give out personal information and students use an avatar name, I allow them to Publish them to the web so they become searchable and public. Publishing is also helpful if students have blogs as they can select to get an embed code.
Making QR codes to share digital books on Google Slides
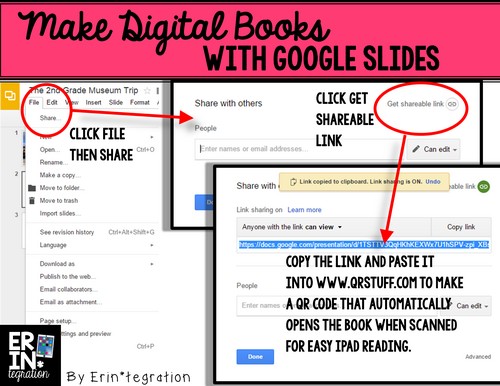
But you can go one step further and create your own digital reading library on the iPad made up of student stories by making QR codes. First students open the File Menu and select share. From there they click “Get link.” The link in blue is the URL you will need to copy.
Paste that URL into the window on www.qrstuff.com then click download QR code (on the right under the code that generates). Print out the code. When scanned with an iPad, the book automatically opens in Slideshow mode – with each page taking up the full screen.
Students will swipe to turn the page – just like a real digital book!
I have had students make their QR codes or I use my quick entry workflow that you can read about {here} to do a class set in minutes. In fact, the main image on that blog post shows our QR codes that link to Google Slides’ stories!
I have also used this same method to create my own stories – whether social stories for students who need them or stories with our vocabulary and spelling words in them for practice.
Student work samples of digital books on Google Slides
Check out a couple of finished student stories. These are both from our nonfiction unit and students also added images they made in PicCollage and Popplet: