
Use the free iPad app Pic Collage to make kid-shaped Christmas trees out of student pictures! Each student can make one using their own selfie or make a group tree using all of the students in the class. This project can be printed and turned into an ornament, Christmas card, or parent gift!

For this project you will need iPads – one or several depending on what kid of tree you want to create – with the free iPad app Pic Collage downloaded on it. You can also purchase the kid-friendly version Pic Collage Edu.
You will also want to establish some web-search guidelines since students will be using the in-app Web Search to find embellishments. Pic Collage uses Bing Safe Search by default, but I recommend pre-searching common terms to be safe. We usually brainstorm search terms together and I write them on the whiteboard.
Christmas Tree Kid Photo Tips
In the example I have pictured, I used one picture of one child over and over again to create the tree. You can also use a single iPad and take pictures of ALL of your students to make up the tree. Either way you decide to complete the project, I recommend the following photo tips to make the process easier.
- Have students
stands against a solid background. - Students should keep their hands at their sides – preferably with hands flat or they can fold their hands. Since students will be tracing around themselves to cut out the image, the
less bumps and details to trace, the better! - Students should try to stand straight and tall. It is easier to shape them into a tree if they are vertical!
Arranging Students in Tree Shapes
After photographing students, students will open Pic Collage, choose Freestyle, then Photos to add their picture.
Double touch the photo and choose Cutout. I suggest pinching to zoom in to get a close view.
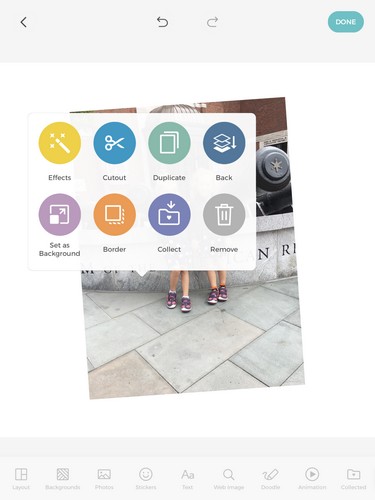
Slowly and carefully trace around the outline of the body. Sometimes Pic Collage will suggest an edit too. Touch check when done.
You can pinch the photo to resize and touch and drag to move it around the canvas.
Duplicate and Arrange Kid-Shaped Christmas Tree
After cutting out one image, double touch the picture and choose duplicate. Repeat roughly 12 times. In the tree example I made, I had 5 pictures on the bottom, 4 in the middle, and 3 at the top.
Starting at the bottom, layer the photos into a tree shape. I like to “hide” the shoes in the upper layers so I recommend double touching and choosing Back to push the upper layers to the back of the canvas.

I also suggest slightly angling the photos on the ends to form a slanted edge. That way the photo collage takes the shape of a tree or triangle.
Embellish Christmas Tree with PNG Elements and a Background
After arranging the tree, use Web Search right in Pic Collage to search for garland, gifts, a star, ornaments, etc. to add to the image. I tell students to search for the term plus the word “PNG” so the elements will have a transparent background and will blend more seamlessly into the image.
In the background menu of Pic Collage, touch the magnying glass and search for “Christmas Background” or “Snowy Background” to pull up some great options.
Students can also add text to their image or even use the Doodle tool to personalize further.
This post was inspired by this beautiful print I saw on Pinterest. If you decide to try this idea and create your own kid-shaped trees, please be sure to tag me on my various Social Media accounts so I can see!