Combine multiple slides into one large slideshow on Google Slides with this easy process. I’m sharing how to put together individual student slideshows into a single class Google slideshow and why you might want to combine more than one separate slideshow into a mega slideshow in the first place!
We used Google Slides in the classroom to complete a variety of projects as well as for digital interactive notebooks. For the most part, I assign one slideshow to each student. There are many times however that I want to take all of my individual student slideshows and put them together into one large slideshow. I mostly do this when we play a game I created and have written about before called Google Scoot.
I am going to share how I make a large slideshow with our Google Scoot results – keep in mine this process will work with ANY student slideshows though – not just Google Scoot so feel free to adapt this workflow for your classroom needs.
Google Scoot Quick Overview
Playing Google Scoot is a fun way to integrate technology and movement with survey questions on a variety of topics. You can read more about Google Scoot here, but the basic premise is each student displays a Google Slideshow on their device with an open-ended question or survey-type question. Students scoot from computer to computer to respond to the question.
I create pre-made Google Scoot games that you can purchase here and use right away! I’m making more all of the time since it has become one of my students favorite whole class games.
At the end of Google Scoot, students can turn in their slideshow via Google Classroom (if available) or share it with the teacher. Sharing the results with the whole class is part of the Google Scoot lesson as it can spark from great discussions.
Some teachers opt to click into the assignment within Google Classroom or “shared with me” folder on their Drive and share one slide at a time.
However, if you are looking for a more seamless way of sharing the finished results, I suggest putting them all together into one large slideshow for easy viewing, sharing, and commenting.
Before turning in Google Scoot Slides…
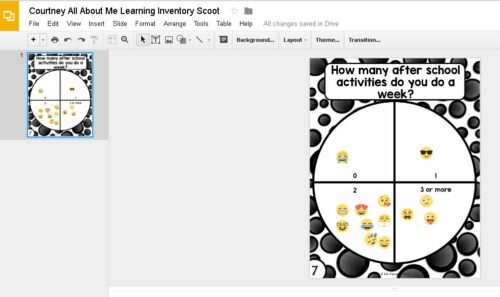
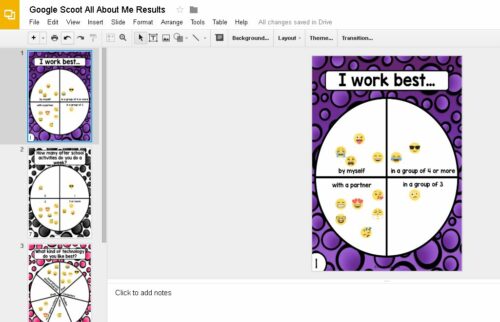
Once students are finished the activity and have arranged the Emojis a bit (spread them out or resized them so they fit), they need to remove ALL of the other slides except for the one with their results. I’m using the results of my class’s All About Me Learning Inventory to demonstrate.
Many will have already deleted most of the extra slides in set up, but make sure to remind students to delete the direction slides too. They should only have ONE slide on their slideshow.
Turning in Google Slides
Students will turn in their slideshows depending on how you pushed the work out. There are 3 scenarios:
- If you used Google Classroom to push out work, students just need to click the “Turn In” button. Their slideshow will be in your Google Drive in a folder called Google Classroom. Assignments are organized by name so depending on what you named your assignment, that is where you will find your student slideshows.
- If you used Google Drive (because your students do not have classroom accounts), you need to make sure students have shared their slides with you. They will be in the “Share with Me” section of your Google Drive. I drag these into one folder I title the name of the Scoot Game. It is important if using this option that you have the files in your main drive and not your “Shared with Me Folder.”
- If you are all sharing the same Google Account, then student slideshows are in the folder you created in the class account for that student. They do not need to turn anything in.
Set Up Your Master Slideshow
The first step is to go to your Google Drive and create a new slideshow. Name this slideshow something like “Google Scoot Results.” This slideshow is where you will combine multiple slides by the students. I think of it like the Master Slideshow.
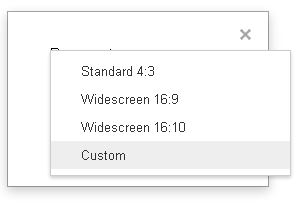
Then Click where it says Widescreen to pull up a menu. Select Custom.
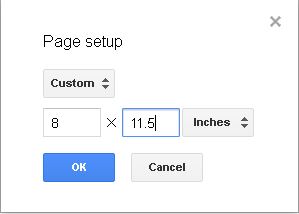
Under Custom input the size as shown and click ok.
Combine Multiple Slides into Your Master Slideshow
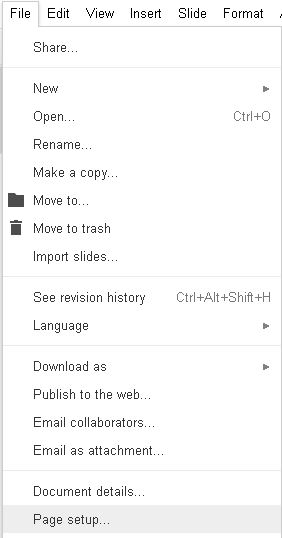
Once your slides are resized, you will need combine the slides from your students. Click File > Import.
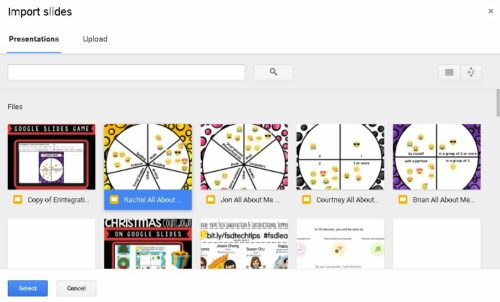
In the Import Slides menu, you will see a list of all of the presentations available to you. If you are NOT seeing your student slides, then you need to make sure you have gathered them into a location on your drive (usually only applies to those of you using Option 2 in the section above).
Click on a presentation and click Select. (Unfortunately, you will need to do one at a time, but it will go quickly). Then click the Slide so it has a blue border around it and click Import.
Just repeat the import process for each slide until you have all of the results in one place! Using this method to combine multiple slides into a single master slideshow for Google Scoot takes me about 5-10 minutes start to finish.
Displaying and Sharing Finished Google Scoot Results
Regardless of the topic of Google Scoot, it is so important to make sure you have share time built into the lesson. When you combine the slides into one slideshow, this saves some time. I usually gather students on the carpet and we look at each slide. Sometimes I have students turn and talk about what we can learn looking at the results. Some of my Google Scoot games have graphs, tables, and other displays that can be reviewed with math standards in mind.
Combining student slideshows into one Google slideshow is a process I use all the time to gather and display work. After doing it once, the process goes faster and it is a useful trick.
Find more Google Scoot games – including a new seasonal line – here and be sure to follow my GAFE Pinterest board for all things Google across the web.

